New (to me) pizza dough recipe

New (to me) pizza dough recipe

I tried a new pizza dough recipe this past weekend – mostly due to my lack of planning.  I oftentimes start putting the dough together the night before to allow the yeast to essentially knead the dough with a long fermentation.  However I forgot to do this so woke up on Sunday realizing I needed a quicker recipe.  I have done my usual same-day bread recipe for pizza dough but was wondering if there was another option.  After some google searching, I settled on a recipe that sounded fairly simple yet good.  This recipe is adapted from Roberta’s (a well-known pizzeria in Brooklyn, NY).  I didn’t have any 00 flour so just used AP flour for the entire recipe.

Ingredients:

  • 306 g AP flour
  • 8 g fine sea salt
  • 2 g active dry yeast
  • 4 g olive oil
  • 200 g warm tap water

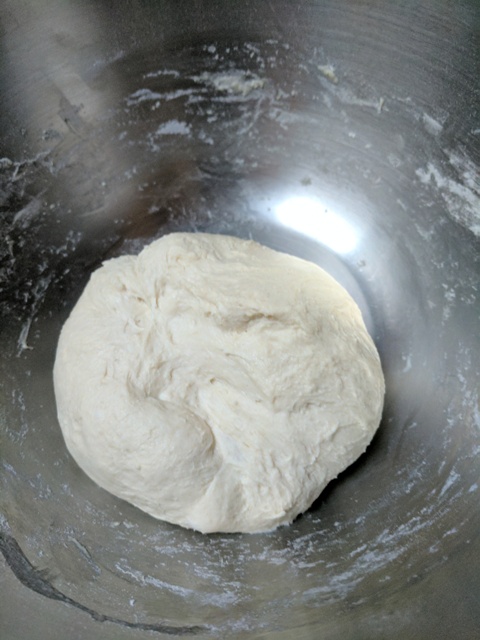
I combined the flour and salt in a mixing bowl.  In my measuring cup, I combined the warm water, olive oil and dry yeast.  I allowed the yeast to bloom for a few minutes before mixing it with the flour/salt mixture.  I kneaded/mixed the dough in the bowl for 3 minutes.

img_20170108_142829

I then covered the bowl with a towel and let it sit for 15 minutes.

img_20170108_144451

I proceeded to knead the dough again for 3 minutes within the bowl.  I was a bit surprised how much the dough had formed up into a cohesive ball.

img_20170108_144654

img_20170108_144700

img_20170108_144940

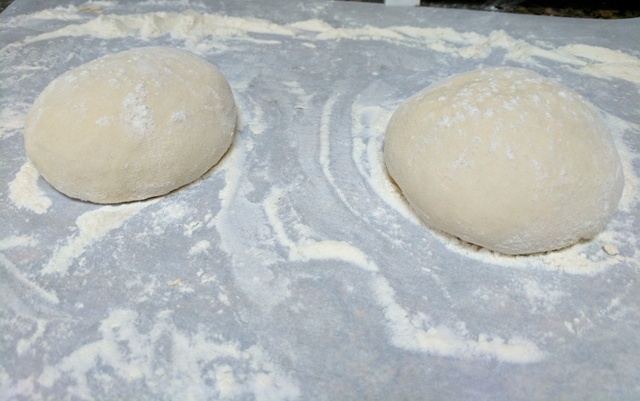
Earlier in the day I had made some pasta so had a large sheet of parchment paper on the counter that was floured.

So I just took the dough and placed it on the parchment paper, divided the dough in half, and formed two balls.

img_20170108_145320

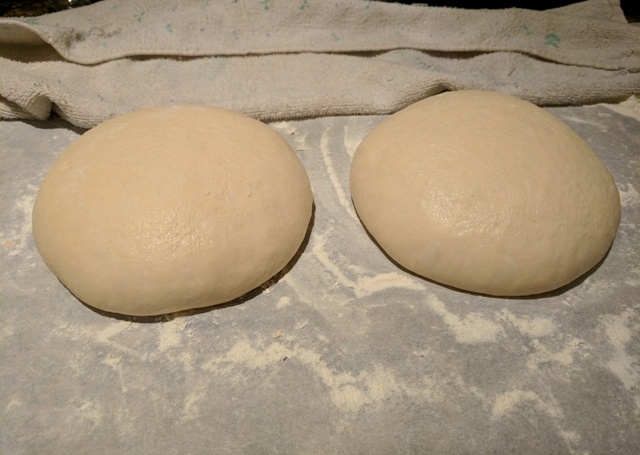
I let the dough rest under a towel (I used my water bottle sprayer to mist the top to maintain moisture) for about 3 hours.   The dough continued to rise.

img_20170108_174749
After 3 hours of rest

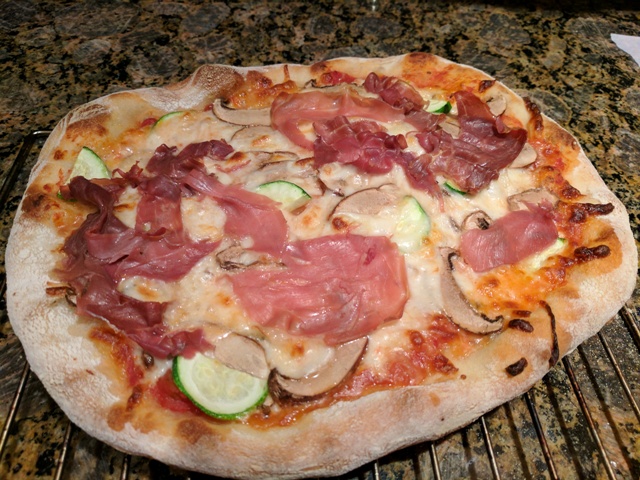
I preheated my oven to 545F.  I took one ball of dough and on a well-floured countertop flattened the dough out into a pizza shape.  I then topped it with marinara, mozzarella, mushrooms, zucchini.

img_20170108_174930

img_20170108_175240

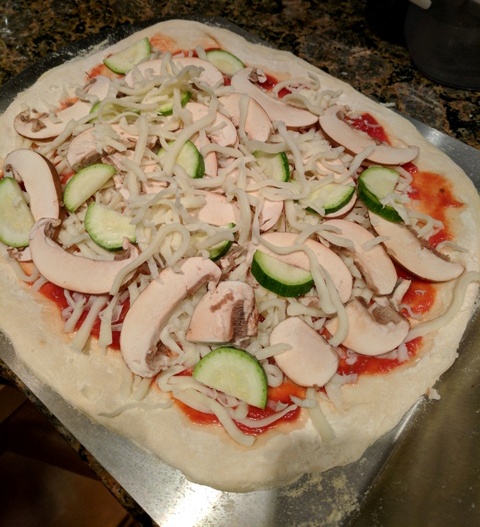
About 1-2 minutes before the pizza was done, I removed it and topped it with some prosciutto.

Et voilà

img_20170108_180424

img_20170108_182000

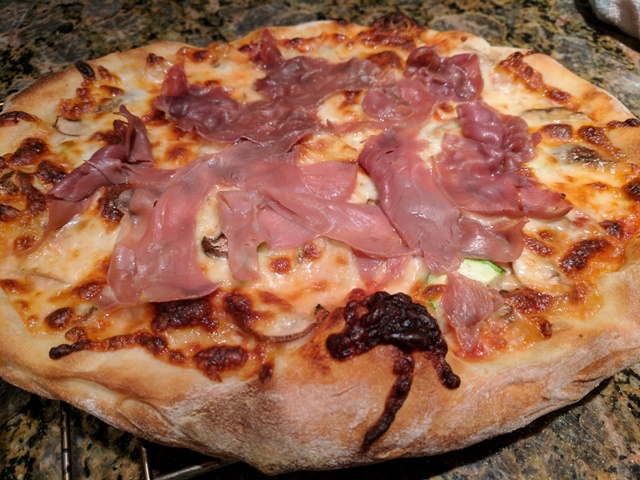
The above recipe makes 2 good-sized pizzas.  I did like this recipe because the dough seemed sturdier than ones I’ve made in the past.  It was easy to create the pizza shape and didn’t rip/tear like some of the ones I’ve created.  Overall I thought the taste was decent.

-StewsCat

No knead sandwich bread

Last week for our work potluck I decided to bring bread since it was easy for me to do and something homemade.  I had already done a trial run on some honey wheat dinner rolls but also wanted a backup.  On my fb feed I saw a posting from King Arthur about how 2016 was the year of no-knead bread.  Now originally when I started my baking endeavors, I started with the no-knead variety just due to the ease of it.  The following link came up the weekend before the potluck.  I really like that you can make this ahead of time and toss it in the fridge for up to 7 days without doing any additional work.  My scale also was on the fritz – which I figured out appears to be due to low battery.

Ingredients:

  • 3.5 cups AP flour
  • 1.5 cup water
  • 1/2 Tbsp salt
  • ~2.2 tsp active dry yeast

Basically I mixed up all the above ingredients in a large mixing bowl.  After covering it with some saran wrap, I let it sit out on the counter for about 2 hours before putting it into the fridge.

img_20161218_201018
After mixing, before letting it sit for 2 hours on counter
img_20161218_222039
After 2 hours on counter

I made up this mixture on Sunday and pulled it out of the fridge on Tuesday evening to make for a Wednesday lunch potluck.  I like how simple the recipe is because after removing it from the fridge, I layed the dough out on my well floured countertop and shaped the dough (no kneading, no stretch and fold, no additional manipulations).  Since my scale was not working, I eyeballed the size of each roll.

img_20161220_205746

Each roll was dusted with some flour.  I covered the rolls and let it sit at room temperature for about 1-1.5 hours to allow it to rise/proof.  After this time, I checked the roll by depressing a finger into the dough.  The dough sprung back about halfway.  During the proofing, I preheated the oven to 450 F.  The recipe calls for using a pan in the bottom of the oven to create steam.  Rather than fussing with this and tossing in water into a hot oven, I elected to just use my water bottle sprayer.

Once the dough was ready, I took a knife and made some slash marks on top of each roll.  I placed the parchment lined cookie sheet of dough into the oven and sprayed the inside with 5-6 spritzes of water before closing the oven door.  Initially I let the bread bake for 10 minutes, then opened the door and quickly spritzed some more water into it.  I then let it bake for an additional ~13-15 minutes.

img_20161220_225359

As you can see, there were some creases that opened up on the sides of the dough.  This was most likely due to my not tightly rolling the dough balls into a cohesive ball.  Nevertheless I think it gave them a more homemade feel.  My coworkers raved and said the bread rolls were good – I didn’t end up getting to try one.

I also attempted to re-create the honey wheat rolls.  However, as described above my scale wasn’t working properly, I had to eyeball the ingredients with volume (measuring cups) rather than weight.  I also tweaked it slightly and so when I had my wife pull it out and start the stretch and fold process (as I had previously done: here), the dough did not come together like I had hoped.  It remained a very moist gloopy mess that you could not form.  In an attempt to salvage it, I put the wet dough into my loaf pan to see if it would at least attempt a rise.  Luckily the dough actually did rise somewhat (maybe 1 inch in the pan) and I tossed it into the oven and hoped for the best.  Overall it didn’t get the oven spring that you’d normally see but it baked well and actually had decent crumb.  Wasn’t my best effort but was still good.

img_20161220_225404

I’m excited to see what I will continue to try doing in 2017!

-StewsCat

Whole wheat honey dinner rolls

Whole wheat honey dinner rolls

Our upcoming work potluck is coming up and so I figured since I bake, I might as well try bringing in some homemade baked goodness.  I had done dinner rolls a long time ago, but that was the classic white bread dinner rolls.  I wanted to try something else and so came up with my own recipe for whole wheat honey dinner rolls.

Ingredients:

  • 250 g 100% whole wheat flour
  • 250 g bread flour
  • 200 g water
  • 150 g whole milk
  • 4 Tbsp butter
  • 70 g honey
  • 2 eggs
  • 1 tsp active dry yeast
  • 8 g salt

I needed to figure out a way to make this so I wouldn’t have to actively be involved for a good chunk of it because the potluck is right in the middle of the work week.  I won’t be able to spend 6-8 hours making the bread.  I figured I’d try to take advantage of the long slow ferment to aid in kneading.

I started the dough around 11 pm at night.  I mixed together the above ingredients.  The butter I threw in a small bowl and melted in the microwave. The eggs I cracked and beat prior to throwing in with everything else.  Since the milk was cool, I used warm water and let the yeast sit in it for about 5 minutes before mixing it in with the rest of the ingredients above.

img_20161215_224202
Immediately after mixing

I let this covered mixture sit out on the counter for about 15 minutes and then put it in the fridge.  Initially I was going to pull it out after about 12 hours but I had some chores to take care of and actually removed it from the fridge about 17 hours after first putting it in.

img_20161216_160955
After 17 hours in fridge

The dough was chilled though still sticky and difficult to knead.  I poured this out onto the counter and did some stretch and folds (maybe 3 of them) and tried to knead it but it was just too sticky/unformed.  I threw the dough back into the bowl and let it rest for 20 minutes.  I then did another stretch and fold on the counter.  Slowly the dough was started to form up a little more into a cohesive mass that I could manipulate.  Another 20 minutes of rest and then I did the stretch and folds still in the bowl (to save of having to clean up the sticky stuff on the counter).  After another 20 minutes, I floured the countertop and poured the dough out onto this and flattened it.

Using my scale, I started to divide the dough into 75-80 g pieces.  For some reason my scale malfunctioned about halfway through the dough and I had to eyeball the last half of it.  Each dough ball I formed into a ball and rolled on the counter to get a roughly spherical shape.  I then placed the dough balls into my 12 inch cast iron.  I had some leftover dough and created a standalone ~150 g ball.

img_20161216_174922

I let this proof for about 1.5 hours until the dough appeared ready (I pressed down on it and the dough sprung back almost all the way).  You can definitely see the dough had proofed nicely and filled in the gaps.

img_20161216_192204

I pre-heated the oven to 430 F while the dough was doing its final proof.  An egg wash was applied (beaten egg with some whole milk) just prior to placing in the oven.  Right after putting the cast iron and separate boule into the oven I used my spray bottle to create some steam in the oven.  I baked the bread at 430 F for 10 minutes.

img_20161216_193452
I then dropped the temperature to 375 F and let it go for another 11.5 minutes or so (I had set the timer for an additional 15 but could tell it was done).  The internal temperature of the dough was ~195-198 F.

img_20161216_194625

img_20161216_202057

The individual roll came out a littler darker, probably because it was baked on its own

img_20161216_194631

Overall the bread has a nice soft crumb in the middle and the honey gives it a nice taste.  I also like that you can tear off a roll and it comes off in a nice individual serving size.

img_20161216_202051

-StewsCat

img_20161215_100249

Whole wheat boules

Whole wheat boules

It has been colder here in Sacramento as of late so we’ve been craving more hearty fare like soup.  We are also trying to be a little bit healthier and soup is a decent way to do that.  To go along  with soup, I thought I’d whip up some small wheat boules (in reality this was earlier this week that I did this).  I wasn’t sure exactly if I was going to do some rolls or what.   I compromised and did some boules.

Ingredients:

  • 200g whole wheat flour (Trader Joe’s)
  • 200g bread flour (King Arthur)
  • 280g lukewarm water
  • 31g honey
  • 1-2 Tbsp vegetable oil (eyeballed)
  • 8g salt
  • 2 tsp active dry yeast

As is typical, I weighed out and mixed all the ingredients above into a somewhat wet cohesive mess and then let it autolyse for about an hour.  After this, I dumped it onto the countertop and kneaded it (combination of slap and fold, regular kneading, etc) for 10-15 minutes.  Then I let it bulk ferment in a bowl for 1.5 hours.

Because our house has been cooler, I started the oven at 350 F and let it start warming up for about 90 seconds, then shut it off and put the dough to ferment in the oven (just above room temp).  After the dough had doubled in size, I dumped it out and performed an envelope stretch and fold (repeated two times at 30 minute intervals).  Then I poured the dough on the counter, flattened it and separated it out into three (2 parts equal size and 3rd part slightly smaller).  So now I had enough for 2 boules and something else.  I ended up doing a longish roll type shape for the last one.  The two boules I shaped and put into bowls for final rising.  The roll-type thing I just let rise on the counter covered.

I pre-heated the loaf pan and my dutch oven in a 450 F oven.  Once the dough reached peak rise (press down on dough, it bounced back about halfway), I put the 2 boules into the dutch oven and cut the top of each.  I cooked the bread for 10 minutes in the covered dutch oven and then removed the cover from the oven and dropped the temperature to 390 F.

img_20161127_201302
After 10 minutes uncovered

I cooked the bread for another 15 minutes (plus 3 more minutes) and it was a nice dark brown color.

My scoring created some neat decorative marks on the top of the bread.

img_20161127_203414

img_20161128_210548
The crumb

I used up the last of my yeast.  I purchased this jar of yeast awhile ago and have kept it in the fridge.  It definitely saw its way through a lot of loaves of bread and pizza.  Good stuff.

img_20161127_170820

-StewsCat


Brioche – loaf and minis

Brioche – loaf and minis

I thought I’d give another shot at Brioche since it is too yummy and the wife likes it.  Last time I made small cupcake size brioche rolls and this time I figured I’d try my hand at a regular size loaf.  In the end I had enough dough to do both a loaf and the mini cupcake size ones.

The following is double the recipe of the minis I made previously.

  • 500 g AP flour
  • 200 g butter, melted
  • 140 g water, room temperature
  • 4 eggs (235 g)
  • 100 g honey (recipe said runny honey, I just used the honey I squeezed outta my container)
  • 10 g salt
  • 6 g yeast

As before, I first whisked the wet ingredients together (butter, water, eggs, honey) for about 60 seconds.  Then I added in the dry ingredients (flour, salt, yeast).

img_20161112_075144

Since this was a no-knead version, after mixing the dry and wet into a homogenized mixture I let it sit for about 2 hours.

img_20161112_075730

This created a fairly wet dough mixture that I then proceeded to do about 3-4 stretch and folds.

img_20161112_101254
After stretch and fold

And that’s really the extent of manipulation of the dough until it is ready to form. I placed the mixture into the fridge to sit for anywhere from 24-48 hours.  I started the process later in the weekend so I ended up only letting it sit for 24 hours covered in the fridge.

This gave me a chance to have a beer.

img_20161112_193234

For those not familiar, Pliny the Elder and its much more rare sibling Pliny the Younger is a well-known craft brew out of the Russian River Brewing company.  Being in NorCal, we are lucky enough to have it on tap at a few establishments and bottled in local stores as well.  I was out with some colleagues the other night at Capitol Tap Room and happened to get the above.  Good stuff.

Back to bread.  After 24 hours in the fridge, the dough came out looking like this:

img_20161113_121529
After 24 hours in fridge

The key here is to work and shape the dough quickly while it is still cold, otherwise it gets sticky and messy.  I created a loaf with 4 round to pill-ish shapes and then had a little extra so threw that into the loaf pan as well.

img_20161113_122225

Then I formed 6 small balls and placed them in the cupcake pan.  As I was forming the last of the balls, the dough definitely started to become more tacky and difficult to work with.

img_20161113_122229

I allowed the cupcake sized doughballs to rise for about an hour.  The loaf I let rise for about 2 hours and 15 minutes.  For both, I used an egg wash (scrambled egg with water to allow for easier spreading).

img_20161113_142411

I set the oven for 375 F initially.  I baked the mini brioches for 8 minutes at 375 F and then turned the temperature down to 320 F for an additional 19 minutes.  This created a nice golden crust and the internal temperature was around 190 F.

img_20161113_141835

The insides of these smaller brioches came out perfect.

img_20161113_143104

The loaf brioche rose quite nicely after the 2 hours and 15 minutes.

img_20161113_142406

I baked this one at 375 F for 10 minutes initially, then at 320 F for an additional ~20 minutes or so.  I was pleasantly surprised by how it all came together.

img_20161113_151901

img_20161113_201119

It came out nice and buttery and not dry.  Overall a nice bread loaf and mini brioches.

We had some fun visitors this weekend.

img_20161113_160318


-StewsCat