No knead sandwich bread

Last week for our work potluck I decided to bring bread since it was easy for me to do and something homemade.  I had already done a trial run on some honey wheat dinner rolls but also wanted a backup.  On my fb feed I saw a posting from King Arthur about how 2016 was the year of no-knead bread.  Now originally when I started my baking endeavors, I started with the no-knead variety just due to the ease of it.  The following link came up the weekend before the potluck.  I really like that you can make this ahead of time and toss it in the fridge for up to 7 days without doing any additional work.  My scale also was on the fritz – which I figured out appears to be due to low battery.

Ingredients:

  • 3.5 cups AP flour
  • 1.5 cup water
  • 1/2 Tbsp salt
  • ~2.2 tsp active dry yeast

Basically I mixed up all the above ingredients in a large mixing bowl.  After covering it with some saran wrap, I let it sit out on the counter for about 2 hours before putting it into the fridge.

img_20161218_201018
After mixing, before letting it sit for 2 hours on counter
img_20161218_222039
After 2 hours on counter

I made up this mixture on Sunday and pulled it out of the fridge on Tuesday evening to make for a Wednesday lunch potluck.  I like how simple the recipe is because after removing it from the fridge, I layed the dough out on my well floured countertop and shaped the dough (no kneading, no stretch and fold, no additional manipulations).  Since my scale was not working, I eyeballed the size of each roll.

img_20161220_205746

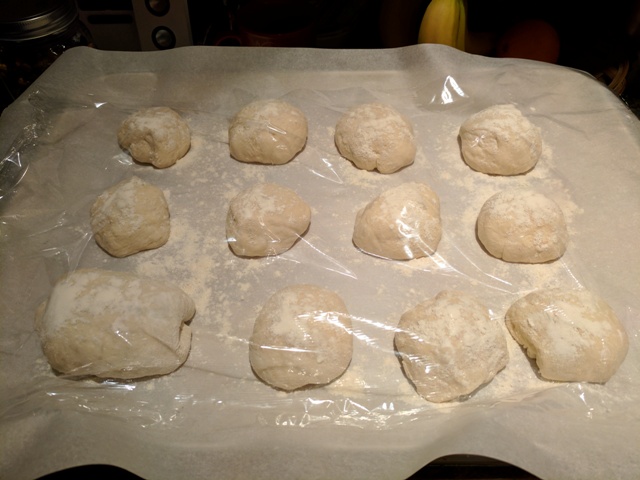
Each roll was dusted with some flour.  I covered the rolls and let it sit at room temperature for about 1-1.5 hours to allow it to rise/proof.  After this time, I checked the roll by depressing a finger into the dough.  The dough sprung back about halfway.  During the proofing, I preheated the oven to 450 F.  The recipe calls for using a pan in the bottom of the oven to create steam.  Rather than fussing with this and tossing in water into a hot oven, I elected to just use my water bottle sprayer.

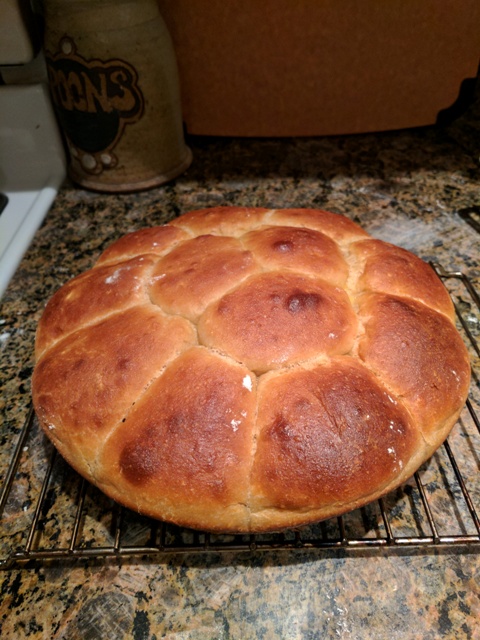
Once the dough was ready, I took a knife and made some slash marks on top of each roll.  I placed the parchment lined cookie sheet of dough into the oven and sprayed the inside with 5-6 spritzes of water before closing the oven door.  Initially I let the bread bake for 10 minutes, then opened the door and quickly spritzed some more water into it.  I then let it bake for an additional ~13-15 minutes.

img_20161220_225359

As you can see, there were some creases that opened up on the sides of the dough.  This was most likely due to my not tightly rolling the dough balls into a cohesive ball.  Nevertheless I think it gave them a more homemade feel.  My coworkers raved and said the bread rolls were good – I didn’t end up getting to try one.

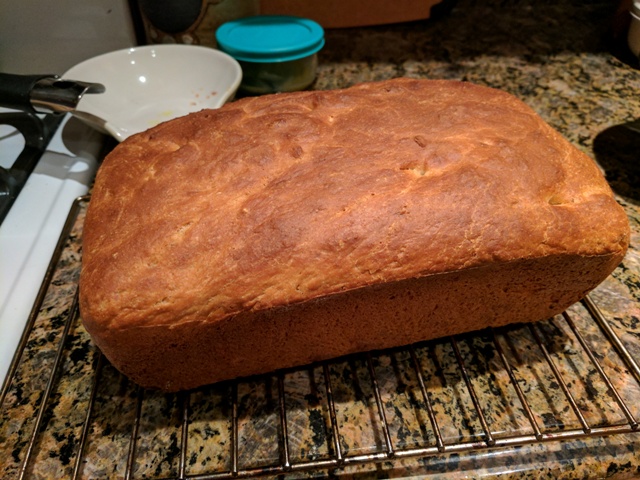
I also attempted to re-create the honey wheat rolls.  However, as described above my scale wasn’t working properly, I had to eyeball the ingredients with volume (measuring cups) rather than weight.  I also tweaked it slightly and so when I had my wife pull it out and start the stretch and fold process (as I had previously done: here), the dough did not come together like I had hoped.  It remained a very moist gloopy mess that you could not form.  In an attempt to salvage it, I put the wet dough into my loaf pan to see if it would at least attempt a rise.  Luckily the dough actually did rise somewhat (maybe 1 inch in the pan) and I tossed it into the oven and hoped for the best.  Overall it didn’t get the oven spring that you’d normally see but it baked well and actually had decent crumb.  Wasn’t my best effort but was still good.

img_20161220_225404

I’m excited to see what I will continue to try doing in 2017!

-StewsCat

Advertisement

Whole wheat honey dinner rolls

Whole wheat honey dinner rolls

Our upcoming work potluck is coming up and so I figured since I bake, I might as well try bringing in some homemade baked goodness.  I had done dinner rolls a long time ago, but that was the classic white bread dinner rolls.  I wanted to try something else and so came up with my own recipe for whole wheat honey dinner rolls.

Ingredients:

  • 250 g 100% whole wheat flour
  • 250 g bread flour
  • 200 g water
  • 150 g whole milk
  • 4 Tbsp butter
  • 70 g honey
  • 2 eggs
  • 1 tsp active dry yeast
  • 8 g salt

I needed to figure out a way to make this so I wouldn’t have to actively be involved for a good chunk of it because the potluck is right in the middle of the work week.  I won’t be able to spend 6-8 hours making the bread.  I figured I’d try to take advantage of the long slow ferment to aid in kneading.

I started the dough around 11 pm at night.  I mixed together the above ingredients.  The butter I threw in a small bowl and melted in the microwave. The eggs I cracked and beat prior to throwing in with everything else.  Since the milk was cool, I used warm water and let the yeast sit in it for about 5 minutes before mixing it in with the rest of the ingredients above.

img_20161215_224202
Immediately after mixing

I let this covered mixture sit out on the counter for about 15 minutes and then put it in the fridge.  Initially I was going to pull it out after about 12 hours but I had some chores to take care of and actually removed it from the fridge about 17 hours after first putting it in.

img_20161216_160955
After 17 hours in fridge

The dough was chilled though still sticky and difficult to knead.  I poured this out onto the counter and did some stretch and folds (maybe 3 of them) and tried to knead it but it was just too sticky/unformed.  I threw the dough back into the bowl and let it rest for 20 minutes.  I then did another stretch and fold on the counter.  Slowly the dough was started to form up a little more into a cohesive mass that I could manipulate.  Another 20 minutes of rest and then I did the stretch and folds still in the bowl (to save of having to clean up the sticky stuff on the counter).  After another 20 minutes, I floured the countertop and poured the dough out onto this and flattened it.

Using my scale, I started to divide the dough into 75-80 g pieces.  For some reason my scale malfunctioned about halfway through the dough and I had to eyeball the last half of it.  Each dough ball I formed into a ball and rolled on the counter to get a roughly spherical shape.  I then placed the dough balls into my 12 inch cast iron.  I had some leftover dough and created a standalone ~150 g ball.

img_20161216_174922

I let this proof for about 1.5 hours until the dough appeared ready (I pressed down on it and the dough sprung back almost all the way).  You can definitely see the dough had proofed nicely and filled in the gaps.

img_20161216_192204

I pre-heated the oven to 430 F while the dough was doing its final proof.  An egg wash was applied (beaten egg with some whole milk) just prior to placing in the oven.  Right after putting the cast iron and separate boule into the oven I used my spray bottle to create some steam in the oven.  I baked the bread at 430 F for 10 minutes.

img_20161216_193452
I then dropped the temperature to 375 F and let it go for another 11.5 minutes or so (I had set the timer for an additional 15 but could tell it was done).  The internal temperature of the dough was ~195-198 F.

img_20161216_194625

img_20161216_202057

The individual roll came out a littler darker, probably because it was baked on its own

img_20161216_194631

Overall the bread has a nice soft crumb in the middle and the honey gives it a nice taste.  I also like that you can tear off a roll and it comes off in a nice individual serving size.

img_20161216_202051

-StewsCat

img_20161215_100249

Whole wheat boules

Whole wheat boules

It has been colder here in Sacramento as of late so we’ve been craving more hearty fare like soup.  We are also trying to be a little bit healthier and soup is a decent way to do that.  To go along  with soup, I thought I’d whip up some small wheat boules (in reality this was earlier this week that I did this).  I wasn’t sure exactly if I was going to do some rolls or what.   I compromised and did some boules.

Ingredients:

  • 200g whole wheat flour (Trader Joe’s)
  • 200g bread flour (King Arthur)
  • 280g lukewarm water
  • 31g honey
  • 1-2 Tbsp vegetable oil (eyeballed)
  • 8g salt
  • 2 tsp active dry yeast

As is typical, I weighed out and mixed all the ingredients above into a somewhat wet cohesive mess and then let it autolyse for about an hour.  After this, I dumped it onto the countertop and kneaded it (combination of slap and fold, regular kneading, etc) for 10-15 minutes.  Then I let it bulk ferment in a bowl for 1.5 hours.

Because our house has been cooler, I started the oven at 350 F and let it start warming up for about 90 seconds, then shut it off and put the dough to ferment in the oven (just above room temp).  After the dough had doubled in size, I dumped it out and performed an envelope stretch and fold (repeated two times at 30 minute intervals).  Then I poured the dough on the counter, flattened it and separated it out into three (2 parts equal size and 3rd part slightly smaller).  So now I had enough for 2 boules and something else.  I ended up doing a longish roll type shape for the last one.  The two boules I shaped and put into bowls for final rising.  The roll-type thing I just let rise on the counter covered.

I pre-heated the loaf pan and my dutch oven in a 450 F oven.  Once the dough reached peak rise (press down on dough, it bounced back about halfway), I put the 2 boules into the dutch oven and cut the top of each.  I cooked the bread for 10 minutes in the covered dutch oven and then removed the cover from the oven and dropped the temperature to 390 F.

img_20161127_201302
After 10 minutes uncovered

I cooked the bread for another 15 minutes (plus 3 more minutes) and it was a nice dark brown color.

My scoring created some neat decorative marks on the top of the bread.

img_20161127_203414

img_20161128_210548
The crumb

I used up the last of my yeast.  I purchased this jar of yeast awhile ago and have kept it in the fridge.  It definitely saw its way through a lot of loaves of bread and pizza.  Good stuff.

img_20161127_170820

-StewsCat


Thanksgiving 2016

Thanksgiving 2016

Typically for Thanksgiving we keep things pretty low-key.  The last few years I’ve typically made Thanksgiving dinner for just a few folks (myself, my wife, and her two sisters).  I’ve done traditional – turkey, cranberry, mashed potatoes, sweet potato casserole, etc – to a play on Thanksgiving (turkey chili, scratch turkey enchiladas, sweet potato ravioli).

However, this year my family was celebrating my grandma’s “88-89″th birthday the day after Thanksgiving.  Most people are in the southern CA region so that was where her surprise birthday dinner was to be held.  We made the last-minute decision to drive down to socal on Thanksgiving morning.  We figured this gave us the best shot at avoiding most of the traffic.

The largest Thanksgiving 5K race called Run To Feed The Hungry is held every year and the starting line is just outside our neighborhood.  Luckily they open up an avenue of exit for us that live here because otherwise we’d be stuck in our neighborhood/house until well after 11 am.  Luckily the drive down was swift – virtually no traffic.

img_20161124_130915
Harris Ranch

We stopped at Harris Ranch for lunch and both had the rib eye dip sandwich.  It was quite delicious.  They also had a bakery onsite and because we were attending Thanksgiving Dinner at my sister’s empty-handed, I elected to pick up some cookies (chocolate chip, snickerdoodles, and oatmeal raisin) to bring to dinner.

We made it down by 4:30 pm (left our house around 9:30 am) and dinner didn’t start until 5:30 pm so we timed it just right.

Thanksgiving dinner was delicious.  The food was a combination of traditional Thanksgiving fare as well as some Chinese food.  It was potluck style so the burden of cooking a ton of food was spread out.  I usually like to contribute and actually cook something but it was actually kinda nice this year not to have to worry about cooking/baking anything.

img_20161124_175748

Someone had made Taiwanese Red-Braised Pork Belly.  This was one of my grandpa’s favorite dishes.  He loved eating the fat of the 3 layer pork.  When I was young I didn’t like eating the “fat” part of this dish but as I have grown up and learned that “fat = flavor,” I ate the fat along with the lean meat and it was yummy.

img_20161124_175533

img_20161124_190757

After dinner my nieces and nephews decided to have a dance party.  My sister had obtained this cool disco light at the store and turned their upstairs loft room into a dance place. Man kids have so much freaking energy.

img_20161124_194722

On Friday before grandma’s dinner, our friends decided to have a Friendsgiving.  While we wouldn’t be able to hang out with them all night, they elected to start the get together a little earlier so that we could attend and see everyone.  It has been a few years since we all hung out.  These are high school friends of ours that I (we)’ve known for at least 20 years.  It was good to see them and their kiddos.

Grandma’s surprise birthday dinner went great.  Things are a lot different nowadays with all the little kids running around.  I still remember when I was the little kid at these huge family gatherings.

We drove back on Saturday morning, trying to avoid the crazy traffic that accompanies the Sunday after Thanksgiving.  The forecast also was for rain starting Saturday afternoon.  Before setting out on the open road, however, we stopped at my MIL’s new digs.  The new place was nice and it was good to see them.  On the way back north we took the 99 instead of the 5.  We stopped at a place called Moo Creamery in Bakersfield.  It was pretty good stuff and tucked away in an industrial area of the city.  Unfortunately we ran into both traffic and weather on the drive up.  There were a few times where we ended up in stop and go traffic for 30-45 minutes.  Then the rain started and was intermittent but heavy during the last hour of the drive.  Fortunately it went smoothly.

I’m loving the new car and the gas mileage it obtains on the highways.  I averaged 39 MPG on the drive down and 41 MPG on the drive back up north.  Not too shabby especially since I wasn’t being light on the gas pedal either.

-StewsCat

img_20161125_214934