Since we’ve been suffering from triple digit heat the last week, I wasn’t planning on making bread this week (hot oven just makes the kitchen that much hotter, especially because we don’t actually have an A/C register in the kitchen – I blame the previous homeowner). However, the wife asked for bread (and/or tortillas) for the week for lunches and of course I obliged with both. I decided I was going to try a 50% whole wheat sandwich loaf baked in my 9″ x 5″ bread pan. I started this whole recipe fairly late in the day (around 2 pm Sunday) and with no poolish. I also did not follow a specific recipe this time.
I did read up on the things you should do when using a whole wheat (whole grain) flour. The extra outer layer on whole grains basically acts like razor blades when you’re trying to develop gluten. I elected to do a 50:50 mixture of whole wheat flour and bread flour because bread flour has a higher gluten content and should allow for good rises/proofing. And while maybe not technically healthy, having 50% whole wheat is healthier than pure white bread. Other tips I read were to make sure that you included some fats (oil) to help with dough texture. I incorporated some honey to help with taste.
50% Whole wheat sandwich bread recipe:
- 300g – 100% Whole wheat bread flour
- 300g – Bread flour
- 145g – Rice milk
- 305g – Water
- 18g – Salt
- 35g – Honey
- 1/4 c. – Vegetable oil
- 10g – Active dry yeast
I mixed up all the above ingredients and let the well-incorporated mixture rest for 30 minutes to allow the flour to absorb all the water. I then proceeded to knead the dough for about 14 minutes using the Richard Bertinet slap & fold method. I could really feel the dough developing good structure this time (before I used to just keep slapping and folding forever not entirely sure that it was developing the gluten structure that I needed). I know because of the whole wheat and its tiny razor blades I needed to make sure the dough was well kneaded. After kneading, I allowed the dough to rest in a large bowl for the bulk fermentation. Bulk fermentation can go anywhere from 1-2 hours depending on temperature. With the aforementioned heatwave we’ve been experiencing, the inside of the house has been around 81-83 so I knew that rises and proofs most likely would be shorter than I expected.
After about 50 minutes I checked on the dough and it had more than doubled in size (~2.5x original). I poured the dough out carefully on a lightly floured countertop and did a stretch and fold a few times. I replaced the dough into the bowl and allowed it to sit for 25 minutes.

The dough had come together nicely (and was not the sloppy wet mess that was my previous attempt at whole wheat bread). I did the envelope fold which helps de-gas the dough somewhat. This was followed by a 10 minute bench rest.

I then formed the dough into the proper shape for the bread pan, ensuring I created a nicely tensioned top portion.
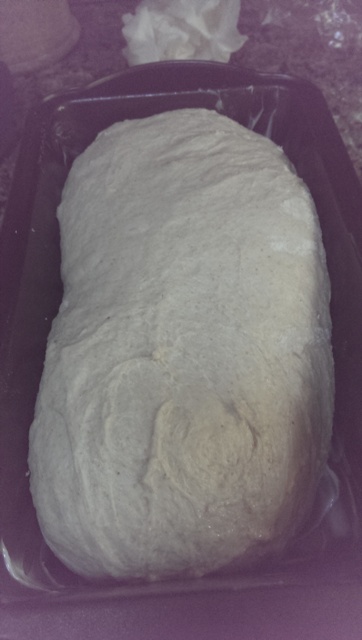
I lightly floured the top of the dough and covered it with a lightweight cloth to proof. I set the timer for 60 minutes but started checking the dough after about 30 minutes (due to the heat of the kitchen). I also pre-heated the oven to 425F. The way to check whether a bread has proofed properly, at least from what I’ve read thus far, is to take a lightly floured finger, press the dough down and see what happens. If it stays down, it has over-proofed, if it bounces back fully it isn’t ready yet (under-proof) and when it bounces back halfway, then it’s proofed.


I wanted to create that “muffin-top” like look for the bread, the same look you get from store-bought sliced bread. I had to look up the dough size I needed to create this, since my 9″ x 5″ bread pan is larger than the standard size. From my research, I came up with a dough around 850-900 grams. As you can see above, I achieved that look I was going for. I had recently ordered some spray bottles so I could spray the oven/bread as it went into the oven to create that nice top crust. I popped the bread pan into the oven, sprayed it and shut the door quickly in my 425F oven. After about 15 minutes, I dropped the temperature to 375 F and sprayed it once more time. A total of 40 minutes baking created the perfect color and doneness (I checked the internal temp which read around 197F).


Since I’m not planning on cutting it until tomorrow when I make my work for lunch, you’ll just have to check back later to see how the crumb and taste turned out. Enjoy!
-StewsCat

Yum! Look at the rise on that bread! Delicious!
LikeLike
Thanks! It works very well as a sandwich bread
LikeLiked by 1 person