This week’s bread baking session did not go as planned and resulted in a not so great product. I’ll still eat it because that’s just me but the wife already has given it a big thumbs down.
I started things off by creating a poolish or preferment. Essentially you mix a small amount of water, flour and yeast and let that sit overnight. This is then added into the final mixture the next day. A preferment is used to create more complex flavors in the final bread product.
I have been looking at various techniques for folding dough as well as for the final shaping process. What I’ve been having a tough time with is getting that nice shaped loaf at the end. Sure the bread tastes good, but I’d like it to also look the part. So I’ve been doing more online research (reading as well as watching various videos). I found what I thought might be a good template (here). I did take away some good information from the video.
I think it all went wrong right from the start. I had written down my recipe/measurements. Though on the fly I decided to change it and along the way my math went a bit haywire. I remembered to subtract the amount of flour in the poolish (100g) from the total (500g), but forgot to subtract the water (100g) from the poolish from the total water (350g). Therefore I ended up with close to 100% hydration bread (500g flour – 450 g water).
I also added in a 30 minute autolyse to this recipe, which was new compared to the last one. Autolyse is supposed to allow the flour to absorb the water better and actually start the gluten formation process with no kneading.
After the autolyse, I realized that I had a very very wet dough. As I started my slap and fold, I realized my mistake and thought I’d be able to correct it by adding in the additional flour needed to create a ~70% hydration dough. I also had forgotten to add the salt so that was added in as well. After adding in additional flour (~150 g) and salt (10g), I tried to incorporate it into the wet dough and march on. Much of the new added flour didn’t actually incorporate into the dough and I ended up removing it from the surface. The result was a decently stick dough but one I could continue to work. Another change from last time was that I only did the slap and fold method about 20 minutes. My previous attempt resulted in me doing the Bertinet slap and fold method for about 60 minutes. After watching some more videos on various slap and fold techniques, I did my slap/fold kneading technique until I felt I had a fairly cohesive dough that would release from the counter with my dough scraper (looking back I realize that maybe I didn’t do this part long enough).
This is also where I added in the new techniques from the above video. I put a small amount of flour on the counter, and did the stretch and fold method (pulling and folding in third, then doing the opposite way – like an envelope). I bench rested it for 10 minutes covered in plastic wrap and repeated the stretch and fold method 3 additional times. Each time, the dough did seem slightly more formed and cohesive though in the back of my mind I knew it wasn’t what it should be.
At this point there was no turning back so I soldiered on.
After the last stretch and fold, I lightly floured the dough and placed it in a large metal bowl to bulk ferment (rise). This is supposed to be done until it is 1.5 times its original size (the video says this can be 2 hours). I think I messed this part up as well because I let it rise past 1.5 times and it probably was as much as 2-2.5 times its original size. The dough also appeared to have some large gas bubbles and was not as solid as I expected it to be.
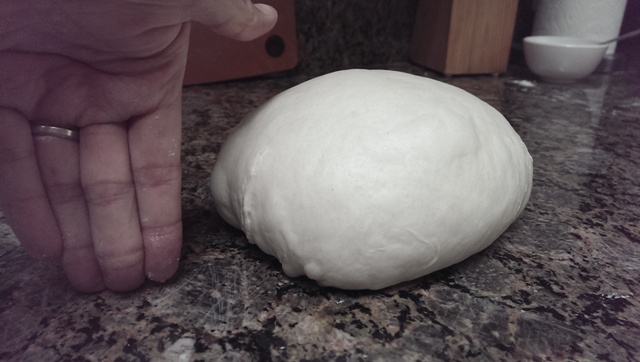
Nevertheless, onwards we marched. I dumped the dough out on a lightly floured surface and did one more stretch/fold. Then I tried the tension pull, which did help form a nice smooth surface on the top of the dough. I placed the dough ball into a flour-sack towel lined bowl (having previously dusted the flour-sack towel with flour to prevent sticking) to proof. The new video said to proof for anywhere from ~2-4 hours or 1.5 times size. I knew it wouldn’t take that long so I checked it at 1 hour and then 1.5 hours. It was hard to say if it had grown 1.5 times. It was definitely overly gassy (large gas pockets all on the surface). It hadn’t taken that “firm” texture that I expect after a proof.
At this point I had no other choice but to see what would happen. I pre-heated by enameled dutch oven in a 500F oven. Carefully, I removed the dutch oven and placed the bread into the dutch oven and tried to score it. As I tried scoring it with my knife, half of the dough ball deflated. I gave up, tossed the lid on the put it back into the oven. After 10 minutes I removed the lid and dropped the temperature to 475 and baked for another 30 minutes.


The end product didn’t come out as I wanted. The oven spring was not as dramatic as I was hoping, but I knew that would probably be the case given the deflation upon putting the bread in the oven.
I let the bread cool as the wife and I headed out for dinner and drinks with a friend who was in town. As a late night snack I wanted to cut into the bread to see what I had produced. I didn’t think the taste was too bad but the wife said that she wasn’t going to eat anymore than she had (a small bite).


The overall crumb structure wasn’t too bad. There wasn’t as much taste and I wonder if it was because I switched from regular salt to a sea salt and maybe it hadn’t mixed properly (with my mishap of adding the salt in much later than I should have and not incorporating it properly).
Summary of mistakes: improper measurements and trying to salvage by tossing in more flour and salt after the initial dough had autolysed, possibly putting in way too much yeast and letting it bulk rise/proof for too long. Mental corrections noted.
Onto the next one: enriched white bread with milk instead of water.
-StewsCat
